GAN 网络之手写数字生成
环境搭建
本例中,所涉及的系统与软件版本列表如下。
| 名称 | 版本 |
|---|
| 操作系统 | Windows 20H2 |
| Anaconda | Anaconda3-2020.11 |
| python | 3.6 |
| tensorflow | 1.8.0 |
本例代码存放于 https://github.com/jinggqu/MachineLearning。
Anaconda 安装
通过清华大学开源软件镜像站,我们可以直接下载最新版本的 Anaconda,本例中使用的 Anaconda 下载链接:
https://mirrors.tuna.tsinghua.edu.cn/anaconda/archive/Anaconda3-2020.11-Windows-x86_64.exe
Anaconda 安装教程网络上已经有很多,故此处不再赘述。
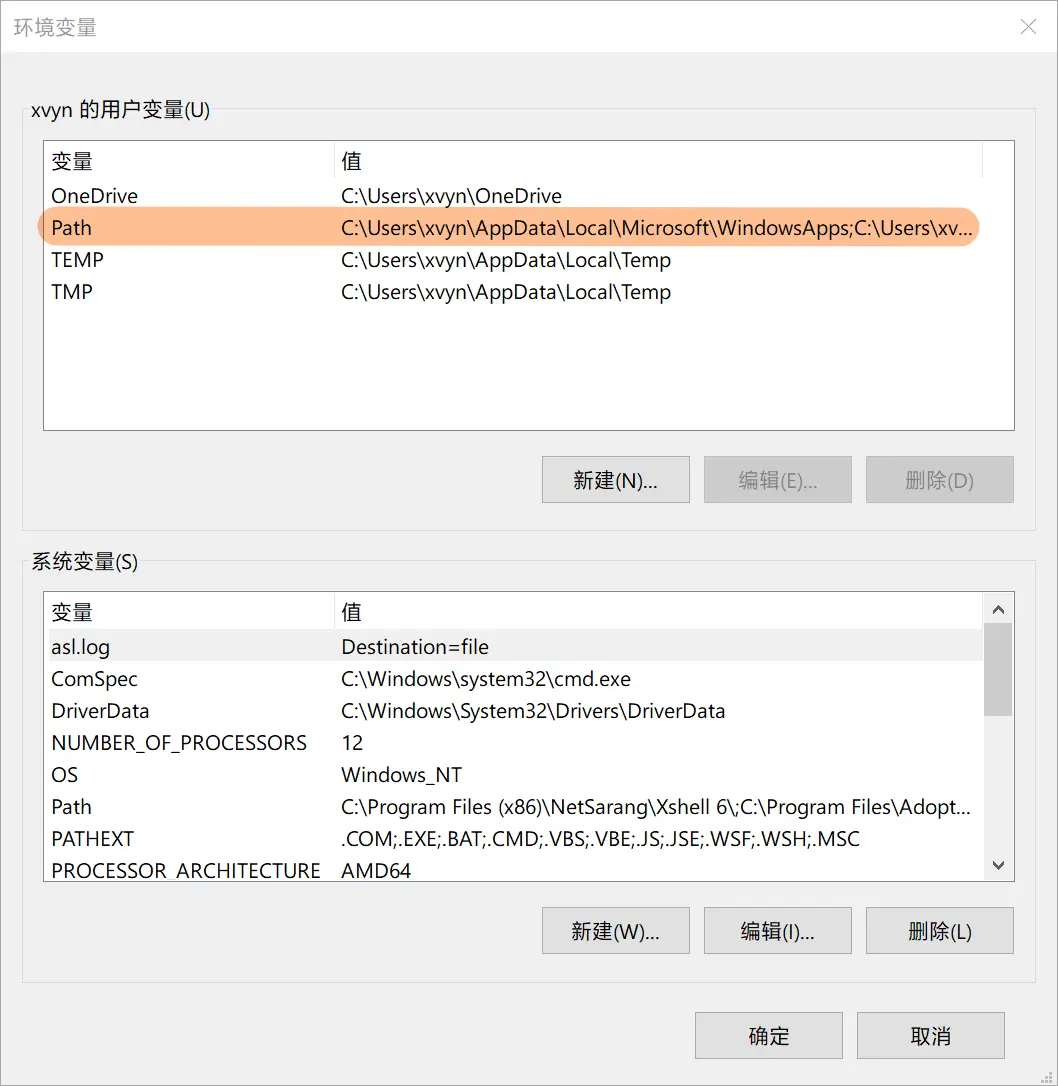
安装完成后,我们需要手动配置 Anaconda 的环境变量,在用户变量的 Path 中添加 Anaconda 的安装路径以及其子文件夹,具体内容如下。
1
2
3
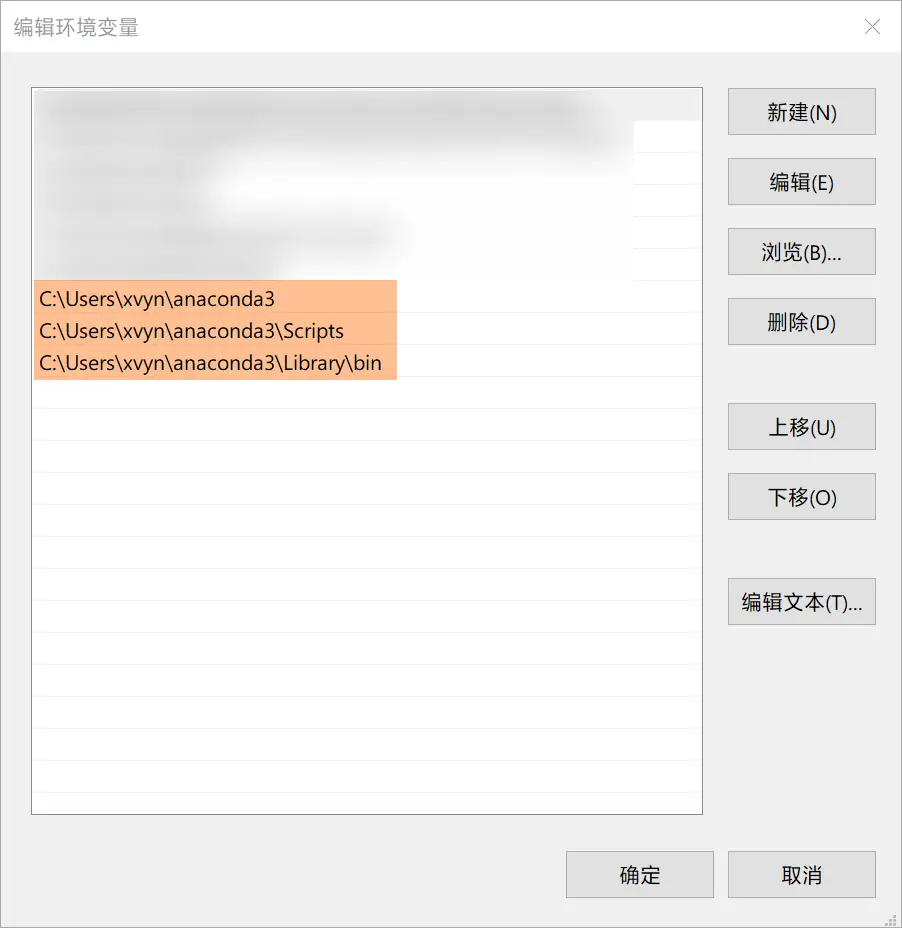
| C:\Users\xvyn\anaconda3
C:\Users\xvyn\anaconda3\Scripts
C:\Users\xvyn\anaconda3\Library\bin
|
上述配置请根据 Anaconda 实际安装路径进行调整,配置完成的效果如下图所示。
完成后打开 cmd 输入下列命令,如果输出内容与下列内容类似,则表示配置正确,可继续后面的步骤。
输出
conda 4.9.2
创建虚拟环境
通过如下命令进行创建一个虚拟环境。
1
| conda create -n handwrittendigits
|
-n handwrittendigits 的作用是指定虚拟环境的名称,本例中指定为 handwrittendigits。
执行结束后,可通过下列命令查看 Anaconda 中所有的虚拟环境。
输出如下
(base) PS C:\Users\xvyn> conda info --envs
conda environments:
base                  *  C:\Users\xvyn\anaconda3
handwrittendigits        C:\Users\xvyn\anaconda3\envs\handwrittendigits
其中,标记 * 的表示目前已启用,命令行前半部分的 (base) 也表示目前启用的是哪个虚拟环境,此例中为 base 环境。
切换虚拟环境
如果使用 PowerShell 进行 Anaconda 的一些操作,需要以 管理员 身份运行 PowerShell,然后执行下列命令。
1
| set-executionpolicy remotesigned
|
执行完成后可通过下列命令进行切换虚拟环境。若使用其他 Shell 工具进行操作,则可直接执行下列命令。
1
| conda activate handwrittendigits
|
如果执行时报错如下,则可以通过 https://github.com/conda/conda/issues/7980 来解决。
Can't execute `conda activate` from batch script
详细操作为:
- 安装并打开 Git Bash
- 执行
source ~/anaconda3/etc/profile.d/conda.sh - 执行
conda init - 重启 PowerShell
切换环境操作结束后,可以注意到命令行左侧的括号内容由 (base) 变为 (handwrittendigits),表明切换成功,后面的操作均在此虚拟环境中进行。
实际操作过程
(base) PS C:\Users\xvyn> conda activate handwrittendigits
(handwrittendigits) PS C:\Users\xvyn>

再次查看所有虚拟环境
(handwrittendigits) PS C:\Users\xvyn> conda info --envs
conda environments:
base                     C:\Users\xvyn\anaconda3
handwrittendigits     *  C:\Users\xvyn\anaconda3\envs\handwrittendigits
更换镜像源(不推荐)
由于 Anaconda 和 pip 官方镜像源访问缓慢,故需要将镜像源更换为国内镜像源,例如清华大学、中科大与阿里云镜像源。使用下列命令可以查看当前 Anaconda 镜像源。
在输出中找到 channel 部分,有如下内容。
channels:
- defaults
default_channels:
- https://repo.anaconda.com/pkgs/main
- https://repo.anaconda.com/pkgs/r
- https://repo.anaconda.com/pkgs/msys2
更换 Anaconda 镜像源
以清华大学镜像源为例,执行下列命令即可完成更换。
1
2
3
4
5
6
7
| conda config --add channels https://mirrors.tuna.tsinghua.edu.cn/anaconda/pkgs/main/
conda config --add channels https://mirrors.tuna.tsinghua.edu.cn/anaconda/pkgs/free/
conda config --add channels https://mirrors.tuna.tsinghua.edu.cn/anaconda/cloud/conda-forge/
conda config --add channels https://mirrors.tuna.tsinghua.edu.cn/anaconda/cloud/msys2/
conda config --add channels https://mirrors.tuna.tsinghua.edu.cn/anaconda/cloud/bioconda/
conda config --add channels https://mirrors.tuna.tsinghua.edu.cn/anaconda/cloud/menpo/
conda config --set show_channel_urls yes
|
恢复默认源
1
| conda config --remove-key channels
|
除了上述命令行操作方式外,也可以直接修改 C:\Users<USER>\.condarc 文件来实现换源。参考 Anaconda 镜像使用帮助 修改后的文件内容如下所示。
ssl_verify: false
show_channel_urls: true
channels:
- defaults
default_channels:
- https://mirrors.tuna.tsinghua.edu.cn/anaconda/pkgs/main
- https://mirrors.tuna.tsinghua.edu.cn/anaconda/pkgs/free
- https://mirrors.tuna.tsinghua.edu.cn/anaconda/pkgs/r
- https://mirrors.tuna.tsinghua.edu.cn/anaconda/pkgs/pro
- https://mirrors.tuna.tsinghua.edu.cn/anaconda/pkgs/msys2
custom_channels:
conda-forge: https://mirrors.tuna.tsinghua.edu.cn/anaconda/cloud
msys2: https://mirrors.tuna.tsinghua.edu.cn/anaconda/cloud
bioconda: https://mirrors.tuna.tsinghua.edu.cn/anaconda/cloud
menpo: https://mirrors.tuna.tsinghua.edu.cn/anaconda/cloud
pytorch: https://mirrors.tuna.tsinghua.edu.cn/anaconda/cloud
simpleitk: https://mirrors.tuna.tsinghua.edu.cn/anaconda/cloud
更换 pip 镜像源(不推荐)
以清华大学镜像源为例,执行下列命令即可完成更换。
1
| pip config set global.index-url https://mirrors.tuna.tsinghua.edu.cn/pypi/web/simple
|
安装 tensorflow
手写数字生成例子所需要的 tensorflow 版本为 1.x,本例中我们使用的实际版本为 1.8.0。将虚拟环境切换到 handwrittendigits 后,执行以下命令开始安装。
1
| conda install tensorflow-gpu=1.8.0
|
上述命令中 tensorflow-gpu 表示安装的 tensorflow 为 GPU 版本,=1.8.0 指定了安装的版本号。若需要安装 CPU 版 tensorflow 1.8.0,执行以下命令即可。
1
| conda install tensorflow=1.8.0
|
安装 Python
由于需要 1.8.0 版本的 tensorflow,此版本仅兼容 3.5 到 3.7 版本的 Python,故需要先删除 conda 环境中默认安装的 Python,并安装 3.6 版本。
1
2
3
4
5
| ## 移除自带 Python
conda remove python
## 安装 3.6 版本
conda install python=3.6
|
测试 Demo
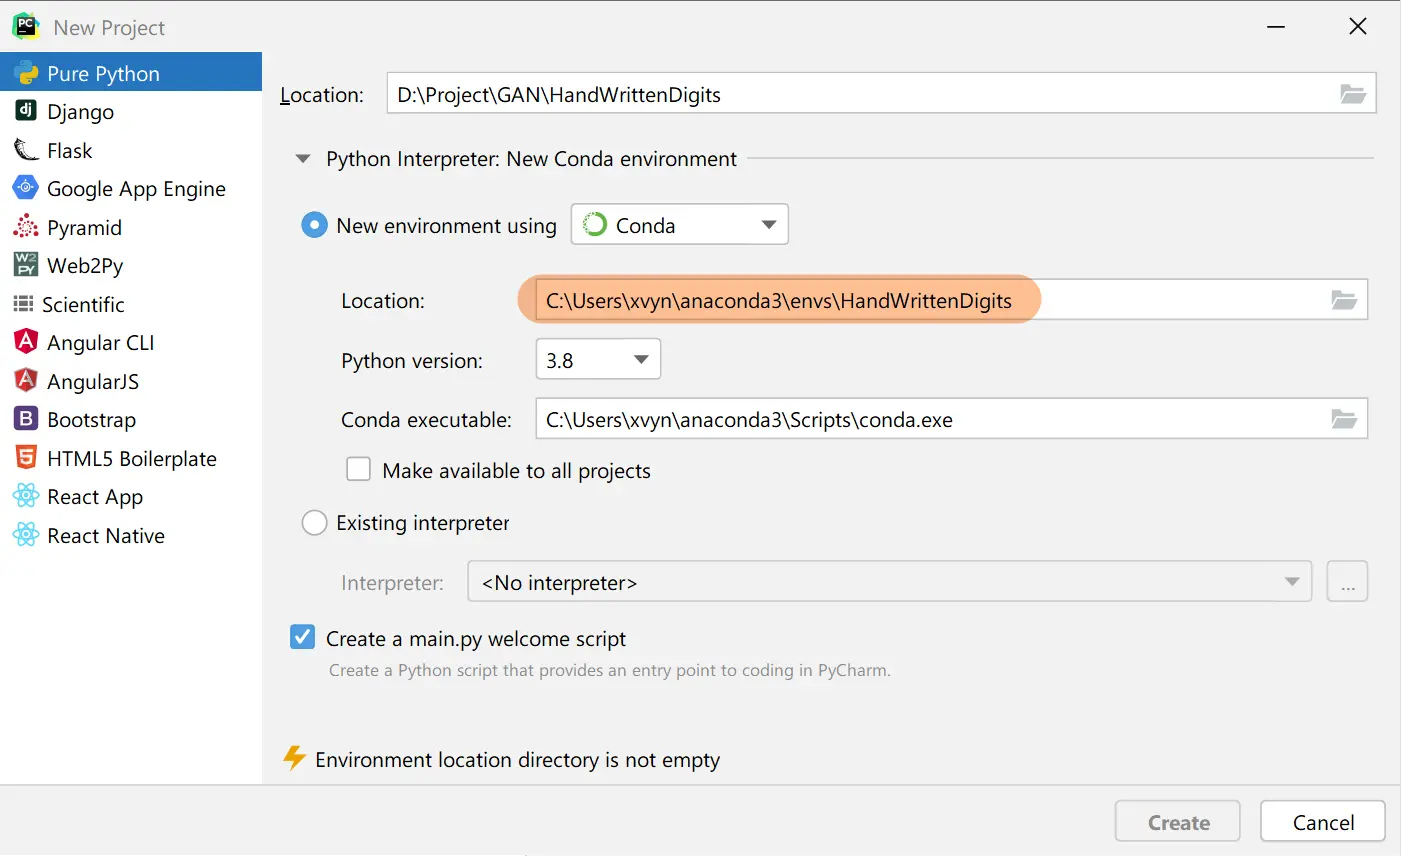
使用 PyCharm 创建项目
在创建项目时,需要将虚拟环境(图中 Location 项)配置为前文中创建的虚拟环境所在目录,然后点击创建项目。
由于此前作者已经创建过项目,故创建窗口下方会提示虚拟环境目录不为空,忽略即可。
运行项目
将以下代码置于项目 main.py 中,运行。
  1
  2
  3
  4
  5
  6
  7
  8
  9
 10
 11
 12
 13
 14
 15
 16
 17
 18
 19
 20
 21
 22
 23
 24
 25
 26
 27
 28
 29
 30
 31
 32
 33
 34
 35
 36
 37
 38
 39
 40
 41
 42
 43
 44
 45
 46
 47
 48
 49
 50
 51
 52
 53
 54
 55
 56
 57
 58
 59
 60
 61
 62
 63
 64
 65
 66
 67
 68
 69
 70
 71
 72
 73
 74
 75
 76
 77
 78
 79
 80
 81
 82
 83
 84
 85
 86
 87
 88
 89
 90
 91
 92
 93
 94
 95
 96
 97
 98
 99
100
101
102
103
104
105
106
107
108
109
110
111
112
113
114
115
116
117
118
119
120
121
122
123
124
125
126
127
128
129
130
131
132
| import tensorflow as tf
from tensorflow.examples.tutorials.mnist import input_data
import numpy as np
import matplotlib.pyplot as plt
import matplotlib.gridspec as gridspec
import logging
import os
if not os.path.exists('./log'):
os.mkdir('./log')
if not os.path.exists('./out'):
os.mkdir('./out')
def get_logger(filepath, level=logging.INFO):
logger = logging.getLogger(__name__)
logger.setLevel(level)
## create a file handler
handler = logging.FileHandler(filepath)
handler.setLevel(logging.INFO)
## create a logging format
## formatter = logging.Formatter('%(asctime)s - %(name)s - %(levelname)s - %(message)s')
## handler.setFormatter(formatter)
## add the handlers to the logger
logger.addHandler(handler)
return logger
def plot(samples):
fig = plt.figure(figsize=(4, 4))
gs = gridspec.GridSpec(4, 4)
gs.update(wspace=0.05, hspace=0.05)
for i, sample in enumerate(samples):
ax = plt.subplot(gs[i])
plt.axis('off')
ax.set_xticklabels([])
ax.set_yticklabels([])
ax.set_aspect('equal')
plt.imshow(sample.reshape(28, 28), cmap='Greys_r')
return fig
def random_data(row, column):
return np.random.uniform(-1., 1., size=[row, column])
def weight_variable(shape, stddev=0.1):
initial = tf.truncated_normal(shape, stddev=stddev)
return tf.Variable(initial)
def bias_variable(shape, bais=0.1):
initial = tf.constant(bais, shape=shape)
return tf.Variable(initial)
## 鉴别网络weights
d_w1 = weight_variable([784, 128])
d_b1 = bias_variable([128])
d_w2 = weight_variable([128, 1])
d_b2 = bias_variable([1])
param_d = [d_w1, d_w2, d_b1, d_b2]
## 生成网络weights
g_w1 = weight_variable([100, 128])
g_b1 = bias_variable([128])
g_w2 = weight_variable([128, 784])
g_b2 = bias_variable([784])
param_g = [g_w1, g_w2, g_b1, g_b2]
## 鉴别网络
def d_network(x):
d1 = tf.nn.relu(tf.matmul(x, d_w1) + d_b1)
d_out = tf.matmul(d1, d_w2) + d_b2
return tf.nn.sigmoid(d_out)
## 生成网络
def g_network(x):
g1 = tf.nn.relu(tf.matmul(x, g_w1) + g_b1)
g_out = tf.matmul(g1, g_w2) + g_b2
return tf.nn.sigmoid(g_out)
x = tf.placeholder(tf.float32, shape=[None, 784])
z = tf.placeholder(tf.float32, shape=[None, 100])
d_out_real = d_network(x)
g_out = g_network(z)
d_out_fake = d_network(g_out)
d_loss = -tf.reduce_mean(tf.log(d_out_real) + tf.log(1. - d_out_fake))
g_loss = -tf.reduce_mean(tf.log(d_out_fake))
d_optimizer = tf.train.AdamOptimizer().minimize(d_loss, var_list=param_d)
g_optimizer = tf.train.AdamOptimizer().minimize(g_loss, var_list=param_g)
batch_size = 256
max_step = 1000000
mnist = input_data.read_data_sets('../mnist', one_hot=True)
logger = get_logger("./log/info.log")
with tf.Session() as sess:
sess.run(tf.global_variables_initializer())
print("training")
i = 0
for step in range(max_step):
batch_real, _ = mnist.train.next_batch(batch_size)
_, d_loss_train = sess.run([d_optimizer, d_loss], feed_dict={x: batch_real, z: random_data(batch_size, 100)})
_, g_loss_train = sess.run([g_optimizer, g_loss], feed_dict={z: random_data(batch_size, 100)})
if step % 1000 == 0:
samples = sess.run(g_out, feed_dict={z: random_data(16, 100)})
fig = plot(samples)
plt.savefig('out/{}.png'.format(str(i).zfill(4)), bbox_inches='tight')
i += 1
plt.close(fig)
logger.info("step %s: d_loss is %s, gan_loss is %s" % (step, d_loss_train, g_loss_train))
print("step %s: d_loss is %s, g_loss is %s" % (step, d_loss_train, g_loss_train))
|
运行时的截图如下,可以看到已经生成了多张手写数字的图片。
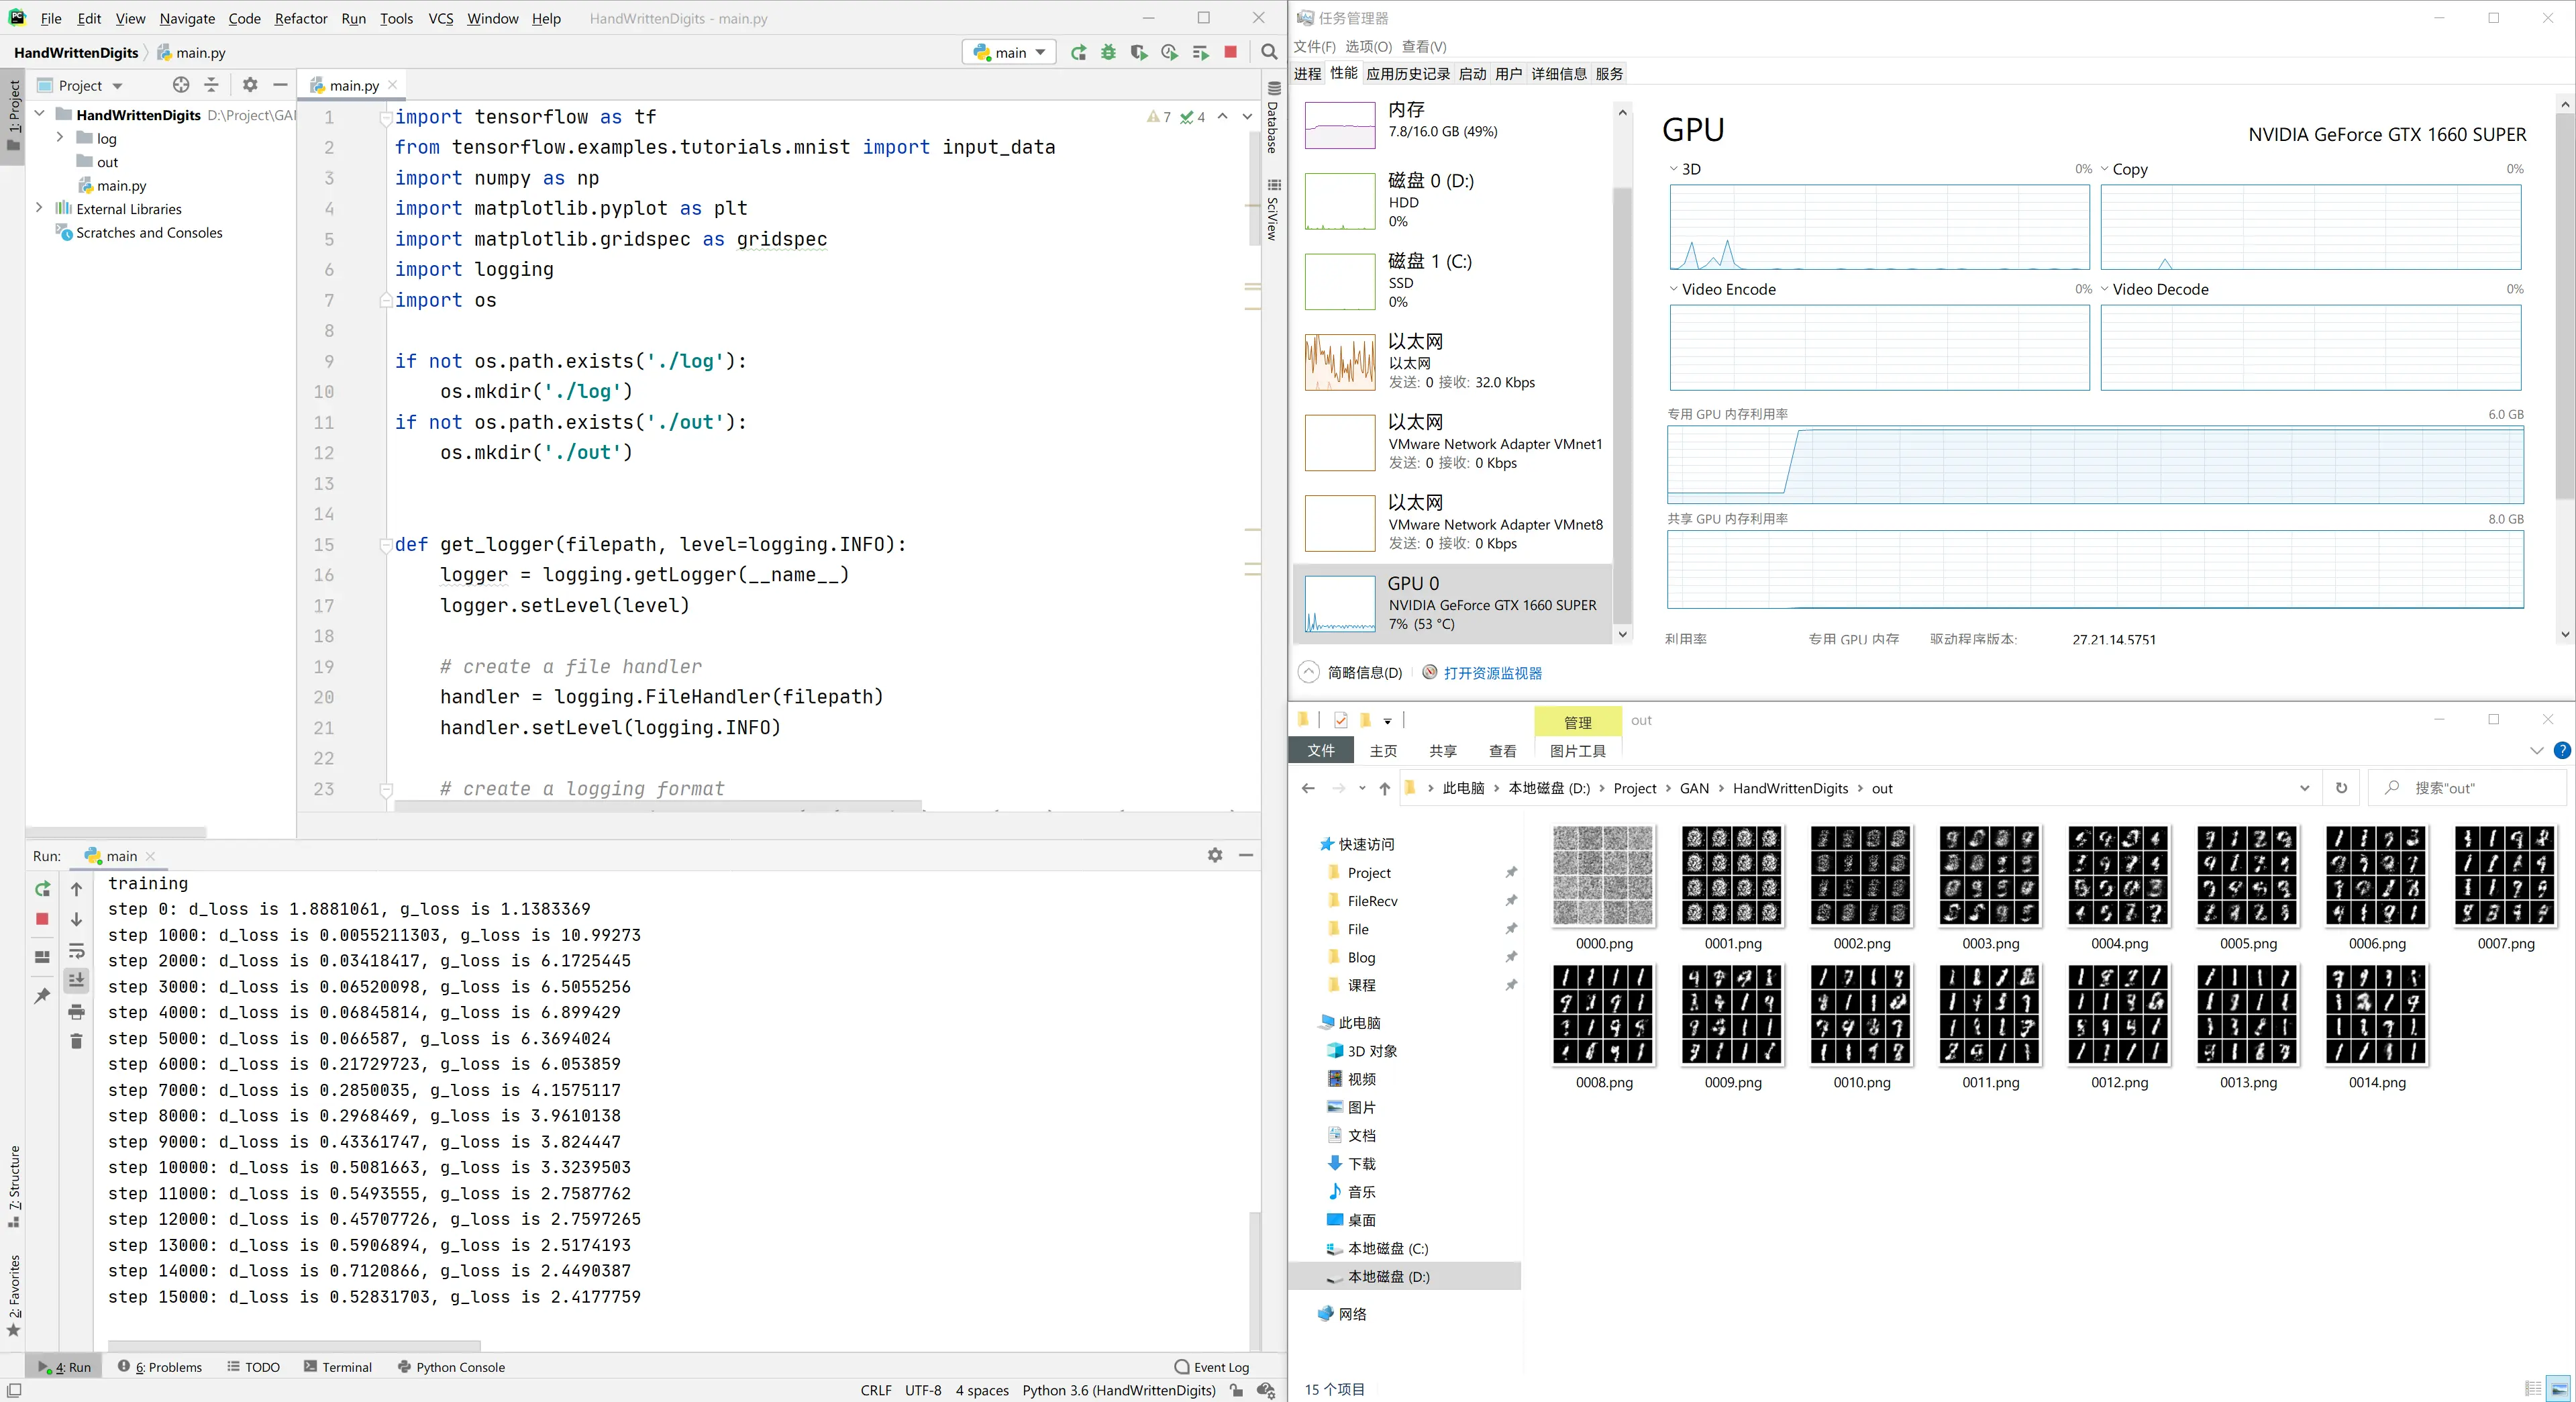
至此,GAN 网络手写数字生成环境搭建已经完成,后续将进行更加深入的学习。
备注
为 jupyter lab 指定 conda 环境,在 conda 环境中执行以下命令后再启动 jupyter lab 即可
参考文章
- Anaconda 源使用帮助
- gan_practice
- Can’t execute
conda activate from bash script - python 安装 TensorFlow 吐血整理
- conda 安装指定版本的指定包
- Python pip 命令行设置国内镜像源