初识 Nginx(二)

初识 Nginx(二)

应用示例

本篇文章中所使用的 Nginx 是通过下载软件包手动编译安装的,详见 上一篇文章 离线安装部分。

在上一篇文章中,我们初步接触了 Nginx 的安装以及使用方法。在本篇文章中我们将以具体的静态网页作为例子,来详细介绍 Nginx 的部分细节。

文件准备

我们以 C++ 文档 dlib 为例做介绍,官网 http://dlib.net,点击左下角的 Download 按钮并将下载好的文件解压。将文件夹中的 docs 目录内容复制到 Nginx 安装目录中的 dlib 目录中。相关的目录结构如下。

 1
 2
 3
 4
 5
 6
 7
 8
 9
10
11
drwxr-xr-x.  9 root   root  258 9月  11 16:54 blog
drwx------.  2 nobody root    6 9月   6 15:26 client_body_temp
drwxr-xr-x.  2 root   root 4096 9月  11 19:48 conf
drwxrwxrwx. 10 root   root 8192 8月   9 03:30 dlib
drwx------.  2 nobody root    6 9月   6 15:26 fastcgi_temp
drwxr-xr-x.  2 root   root   40 9月   6 15:24 html
drwxr-xr-x.  2 root   root   58 9月  11 16:20 logs
drwx------.  2 nobody root    6 9月   6 15:26 proxy_temp
drwxr-xr-x.  2 root   root   19 9月   6 15:24 sbin
drwx------.  2 nobody root    6 9月   6 15:26 scgi_temp
drwx------.  2 nobody root    6 9月   6 15:26 uwsgi_temp

修改配置

编辑 conf/nginx.conf,将 server 中的 location 部分修改为如下配置。

1
2
3
4
location / {
    alias dlib/;
    #...
}

其中,location 后的 / 代表根域名指向括号中的目录配置,alias 指定一个目录替代默认目录。

更多信息可以查看官方文档
http://nginx.org/en/docs/http/ngx_http_core_module.html#alias

重新加载

执行以下命令,以新加载 Nginx 服务。

1
nginx -s reload

访问

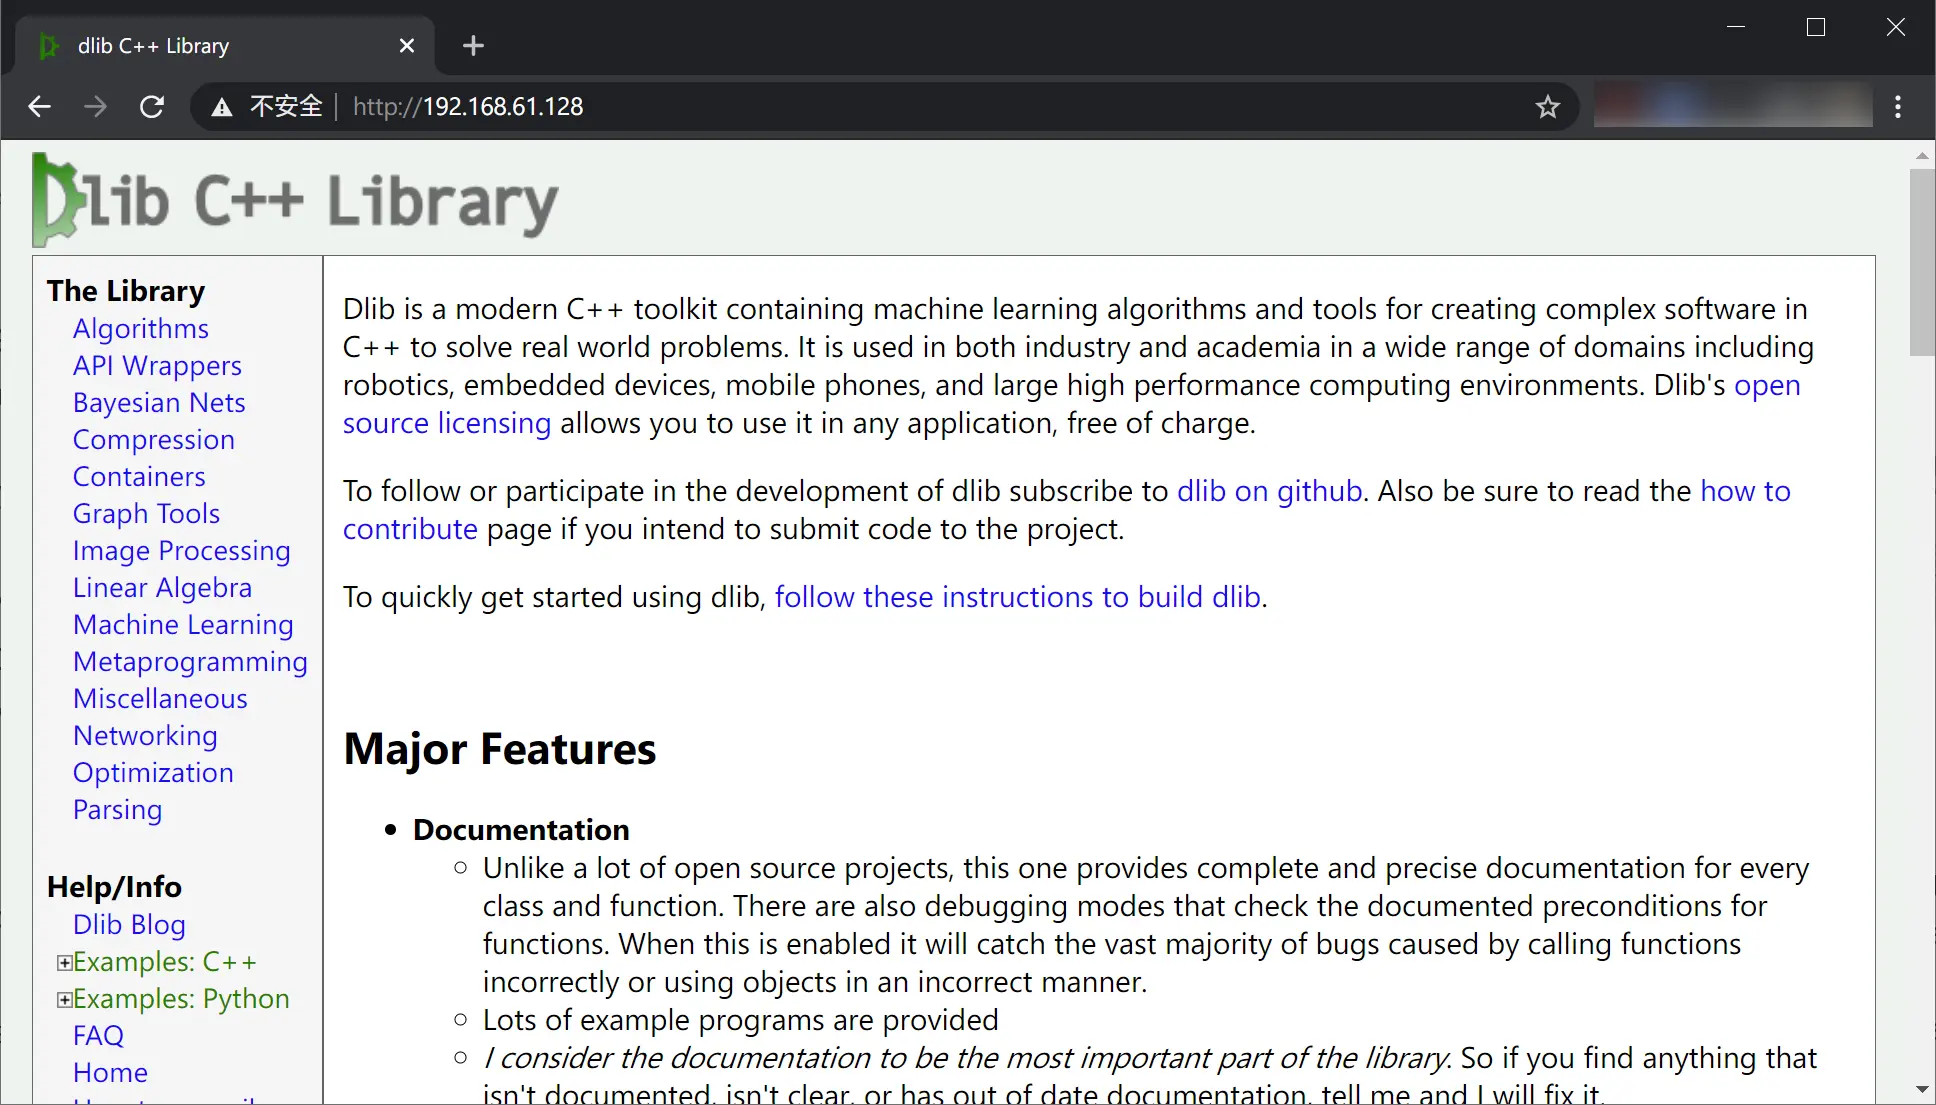
执行完以上步骤后,访问 Nginx 的地址,即可看到 dlib 下的静态文件已经被正常加载了。如下图。

dlib 文档页面通过 Nginx 访问

常用配置

以下内容均在 nginx.conf 文件中进行配置。

数据压缩

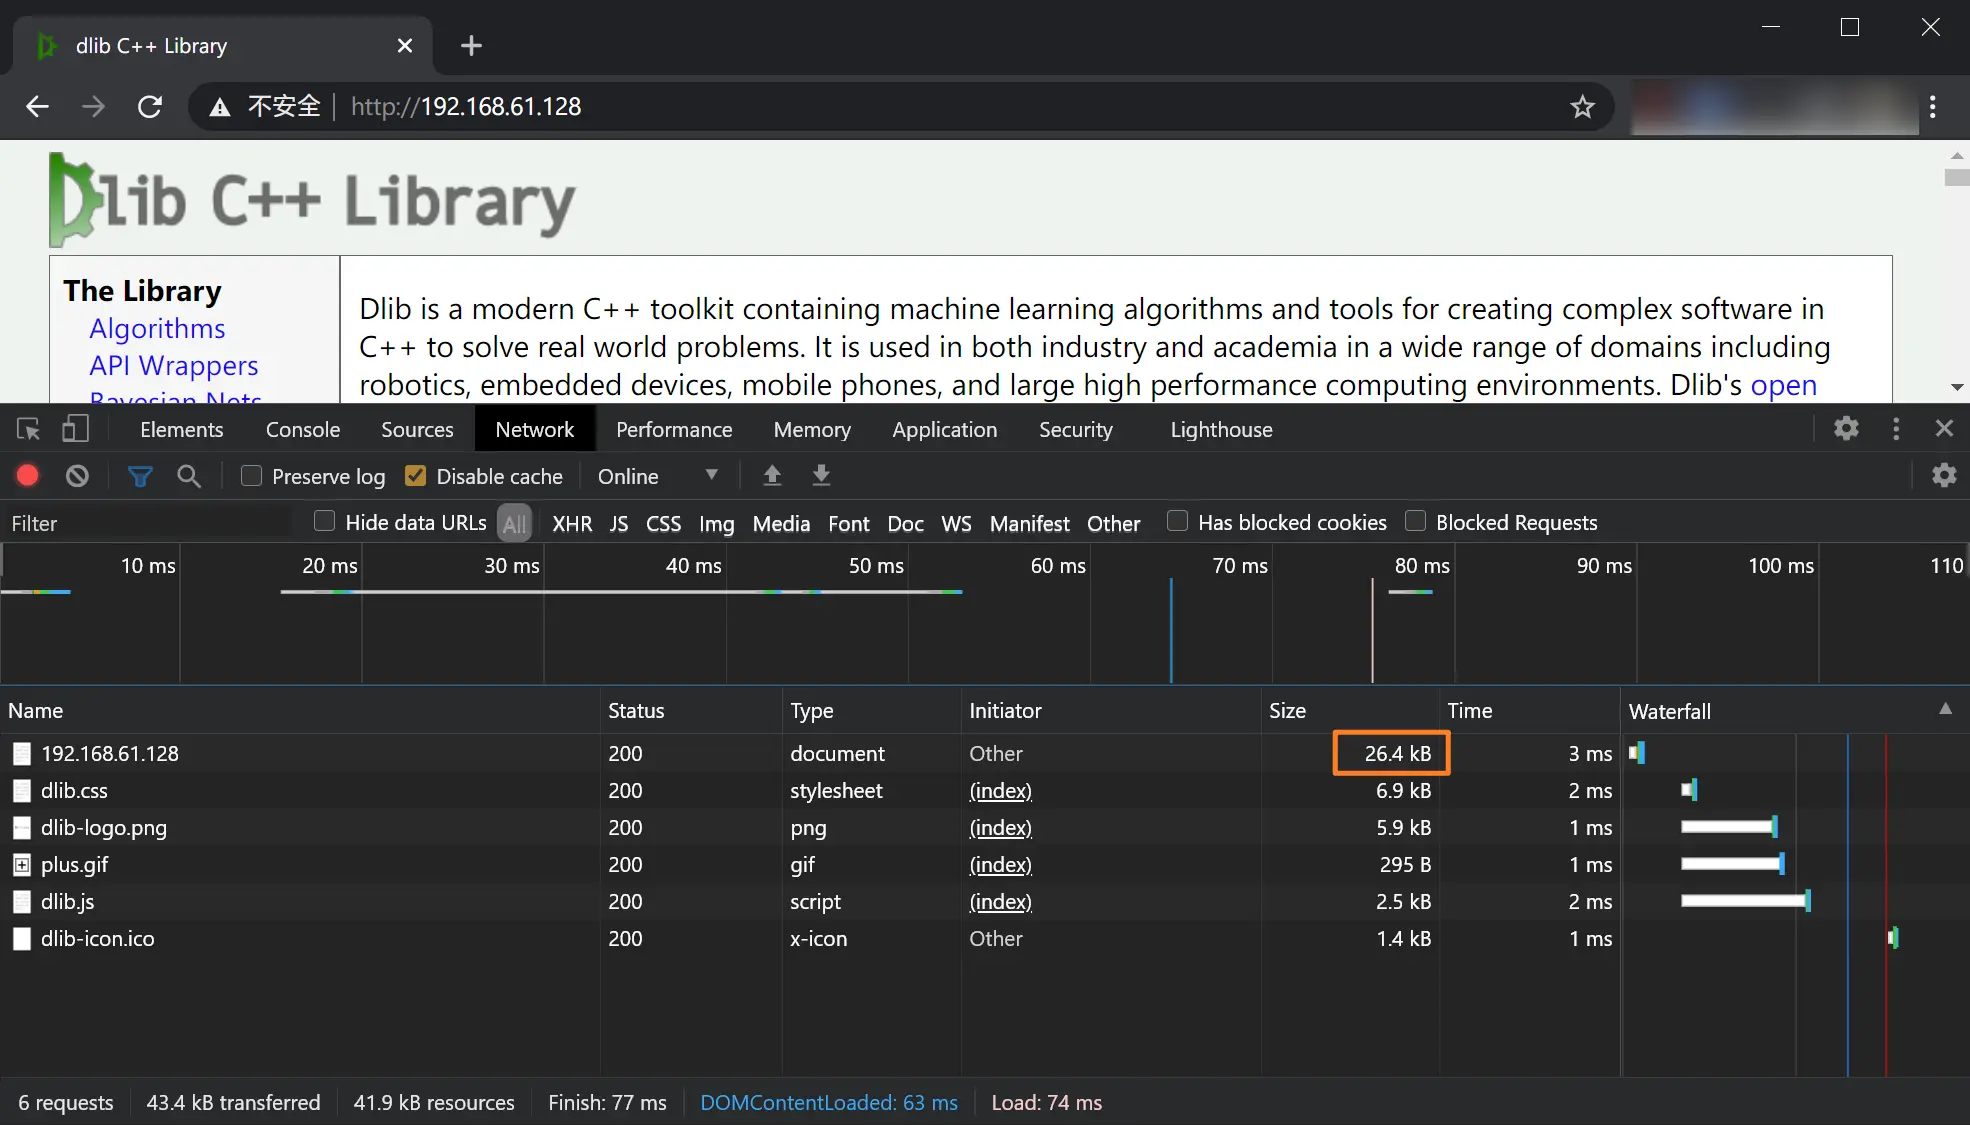
根据以上的配置,我们已经可以正常访问部署好的静态网页,但是根据开发者工具我们可以看到,首页的大小是 26.4 kB。我们还可以进一步进行优化,将所需要加载的数据进行压缩,使其所需数据量大大减少。

优化前

在 http 部分中添加以下配置。

1
2
3
4
gzip  on;
gzip_min_length 1;
gzip_comp_level 2;
gzip_types text/plain application/x-javascript text/css application/xml text/javascript application/x- httpd- php image/jpeg image/gif image/png;

本例中所涉及到的配置释义如下。

配置释义
gzip on | off是否启用数据压缩
gzip_min_length会被压缩的响应的最小长度(单位 kB),即返回内容大于此配置时才会被压缩
gzip_comp_level设置 gzip 压缩等级,等级越小压缩速度越快、文件压缩比越小。压缩等级范围是 1-9,压缩等级越高对性能要求越高。
gzip_types设置需要压缩的 MIME 类型,非设置值不进行压缩,即匹配压缩类型

更多信息可以查看官方文档
http://nginx.org/en/docs/http/ngx_http_gzip_module.html

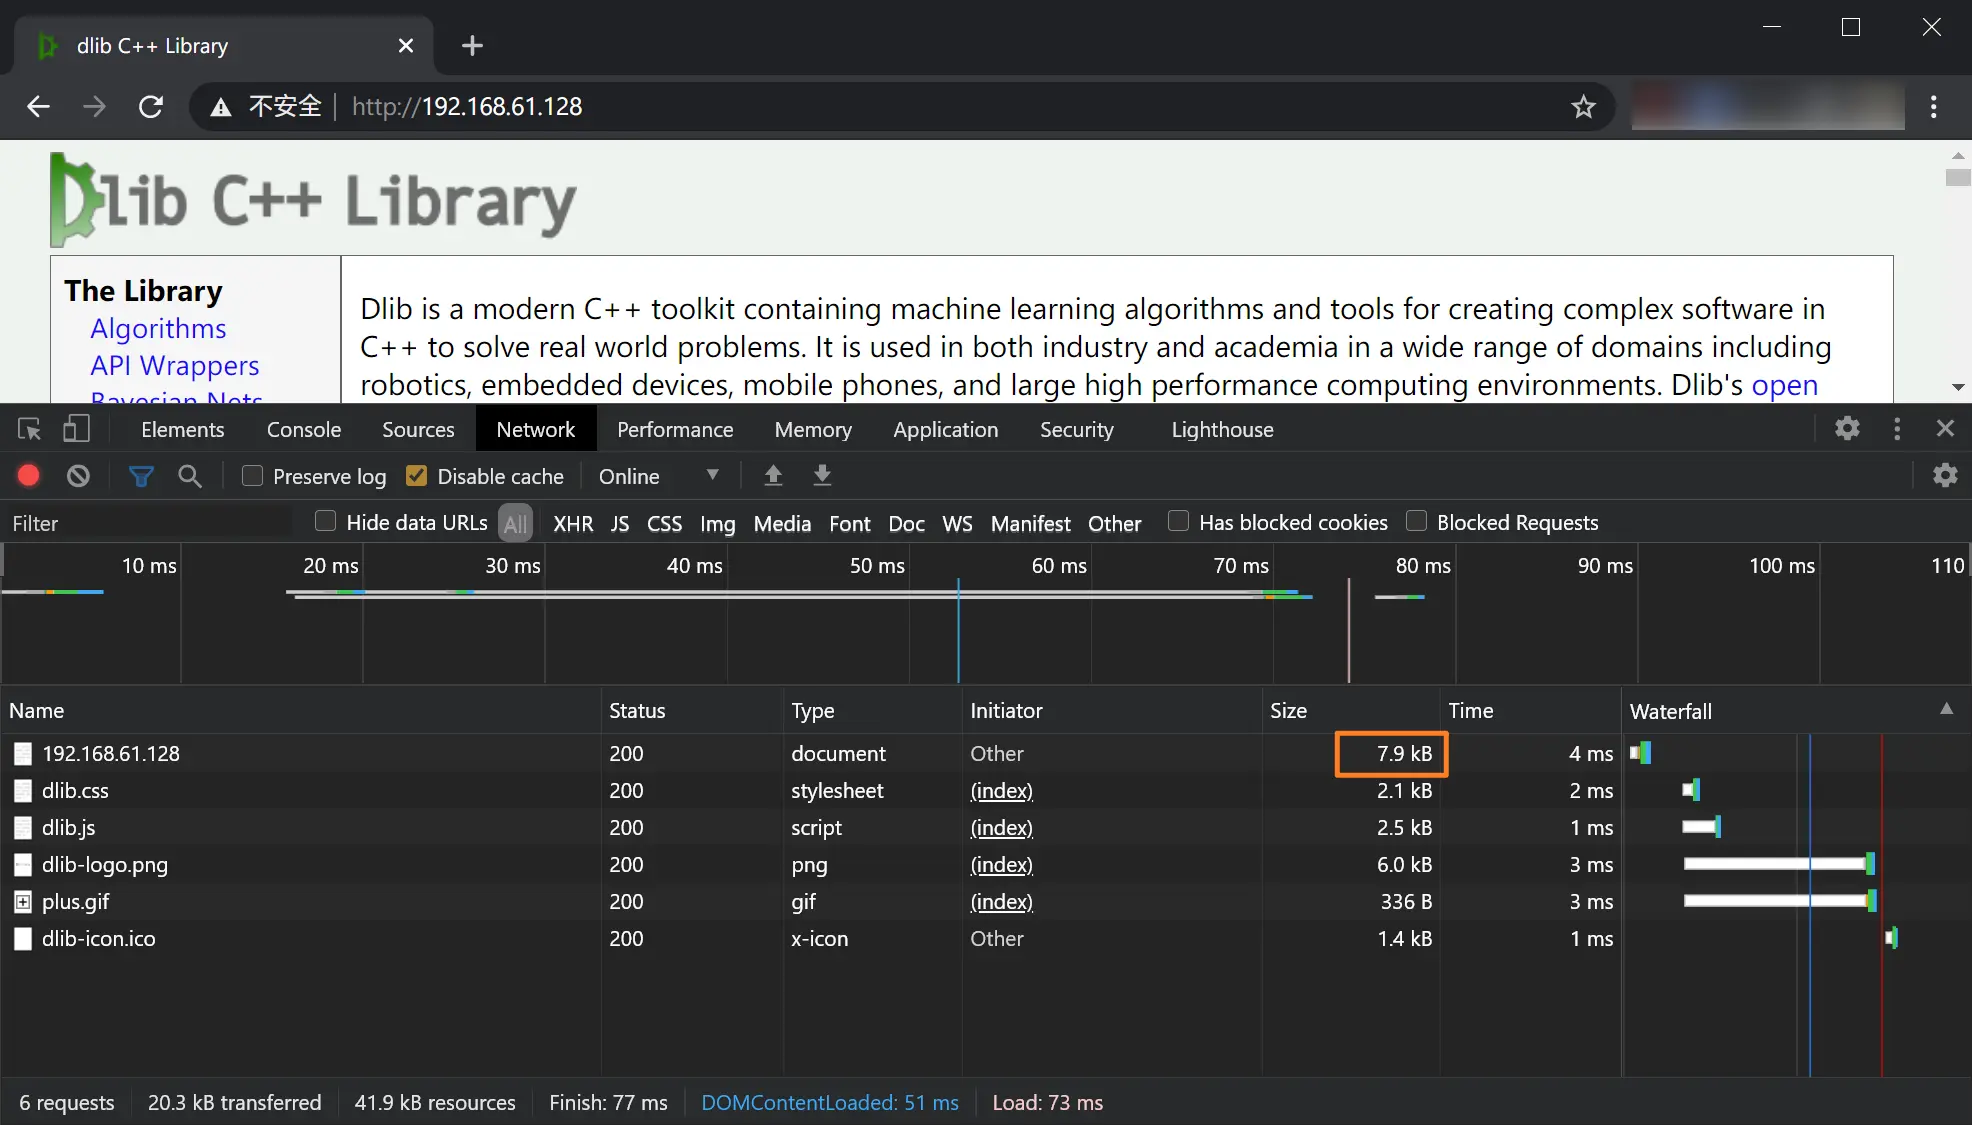
可以看到,开启 gzip 压缩后,加载的数据量大幅减少。

优化后

加载速度

使用 limit_rate 可以对网页加载速度进行控制,详细如下。

1
2
3
4
5
server {
    #...
    set $limit_rate 1k;
    #...
}

其中,$limit_rate 是控制访问速度的变量。后面紧跟的 1k 是需要限制的速度,此例中的单位为 kB,也可以设置其他单位,例如 1M

更多信息可以查看官方文档
http://nginx.org/en/docs/http/ngx_http_core_module.html#var_limit_rate

记录日志

http 模块中,可以配置日志记录的格式,以及日志记录的位置和文件名等等,配置如下。

1
2
3
4
5
6
7
8
9
http {
    #...
    log_format  main  '$remote_addr - $remote_user [$time_local] "$request" '
                      '$status $body_bytes_sent "$http_referer" '
                      '"$http_user_agent" "$http_x_forwarded_for"';

    access_log  logs/sample.log  main;
    #...
}

更多信息可以查看官方文档
http://nginx.org/en/docs/http/ngx_http_log_module.html#access_log

反向代理

在此部分,我们使用两台 Nginx 服务器作为示例,分别是 192.168.61.128192.168.61.129,简记为 CentOS_1 与 CentOS_2。

修改 CentOS_1 的 Nginx 配置文件,修改部分如下,此时直接访问 192.168.61.128 已经不能正常进行加载。

1
2
3
4
5
server {
    listen       127.0.0.1:80;
    server_name  localhost;
    #...
}

修改 CentOS_2 的 Nginx 配置文件,修改部分如下,我们将 192.168.61.129:80 指向了 192.168.61.128:80

 1
 2
 3
 4
 5
 6
 7
 8
 9
10
11
12
13
14
15
16
upstream local {
    server 192.168.61.128:80;
}

server {
    listen       80;
    server_name  192.168.61.129;
    location / {
        proxy_set_header Host $host:$server_port;
        proxy_set_header X-Real-IP $remote_addr;
        proxy_set_header X-Forwarded-For $proxy_add_x_forwarded_for;

        proxy_pass http://local/;
    }
    #...
}

分别在两台机器上重新加载 Nginx 配置文件,并访问 192.168.61.129:80,此时可以正常打开 192.168.61.128:80 上所配置的静态文件。

上述配置可以参考官方文档
http://nginx.org/en/docs/http/ngx_http_proxy_module.html#proxy_set_header

日志可视化

在本例中,我们使用 GoAccess 首先日志试试可视化。

安装 GoAccess

由于此例中使用的系统是 CentOS 8,安装 GoAccess 之前需要先配置 epel 源。

配置 epel 源

  1. 安装 epel 配置包
1
yum install -y https://mirrors.aliyun.com/epel/epel-release-latest-8.noarch.rpm
  1. 将 repo 配置中的地址替换为阿里云镜像站地址
1
2
sed -i 's|^#baseurl=https://download.fedoraproject.org/pub|baseurl=https://mirrors.aliyun.com|' /etc/yum.repos.d/epel*
sed -i 's|^metalink|#metalink|' /etc/yum.repos.d/epel*

安装 GeoIP

编译安装 GoAccess 需要用到 GeoIP。

1
sudo yum -y --enablerepo=epel install geoip

安装 GoAccess

根据官网的文档,我们顺序执行以下命令即可。

1
2
3
4
5
6
wget https://tar.goaccess.io/goaccess-1.4.tar.gz
tar -xzvf goaccess-1.4.tar.gz
cd goaccess-1.4/
./configure --enable-utf8 --enable-geoip=legacy
make
make install

安装完成后,使用以下命令,若得到类似结果则表明安装成功。

1
goaccess -v
1
2
3
4
5
6
7
GoAccess - 1.4.
For more details visit: http://goaccess.io
Copyright (C) 2009-2020 by Gerardo Orellana

Build configure arguments:
  --enable-utf8
  --enable-geoip=legacy

配置 GoAccess

在使用前,我们需要对 GoAccess 的配置文件进行一些修改,以方便后续使用。

1
vim /usr/local/etc/goaccess/goaccess.conf

在此配置文件中,将以下内容取消注释,其他内容则保持不变。

1
2
3
4
5
6
7
#...
no-ip-validation true
log-format COMBINED
time-format %H:%M:%S
date-format %d/%b/%Y
real-time-html true
#...

启动监听

在 Nginx 的 logs 目录中,我们以 access 为源文件,启动 GoAccess 进程后,会产生一个 websocket 长连接,持续监听客户端的请求数据,进而实时展现在 report.html 页面上。

1
2
cd /usr/local/nginx/logs
goaccess access.log -o ../html/report.html

此时我们还需要修改 nginx.conf 使报告页面可以直接访问,在 server 部分添加如下内容。

1
2
3
location /report.html {
    alias html/report.html;
}

然后重新加载配置即可。

1
nginx -s reload

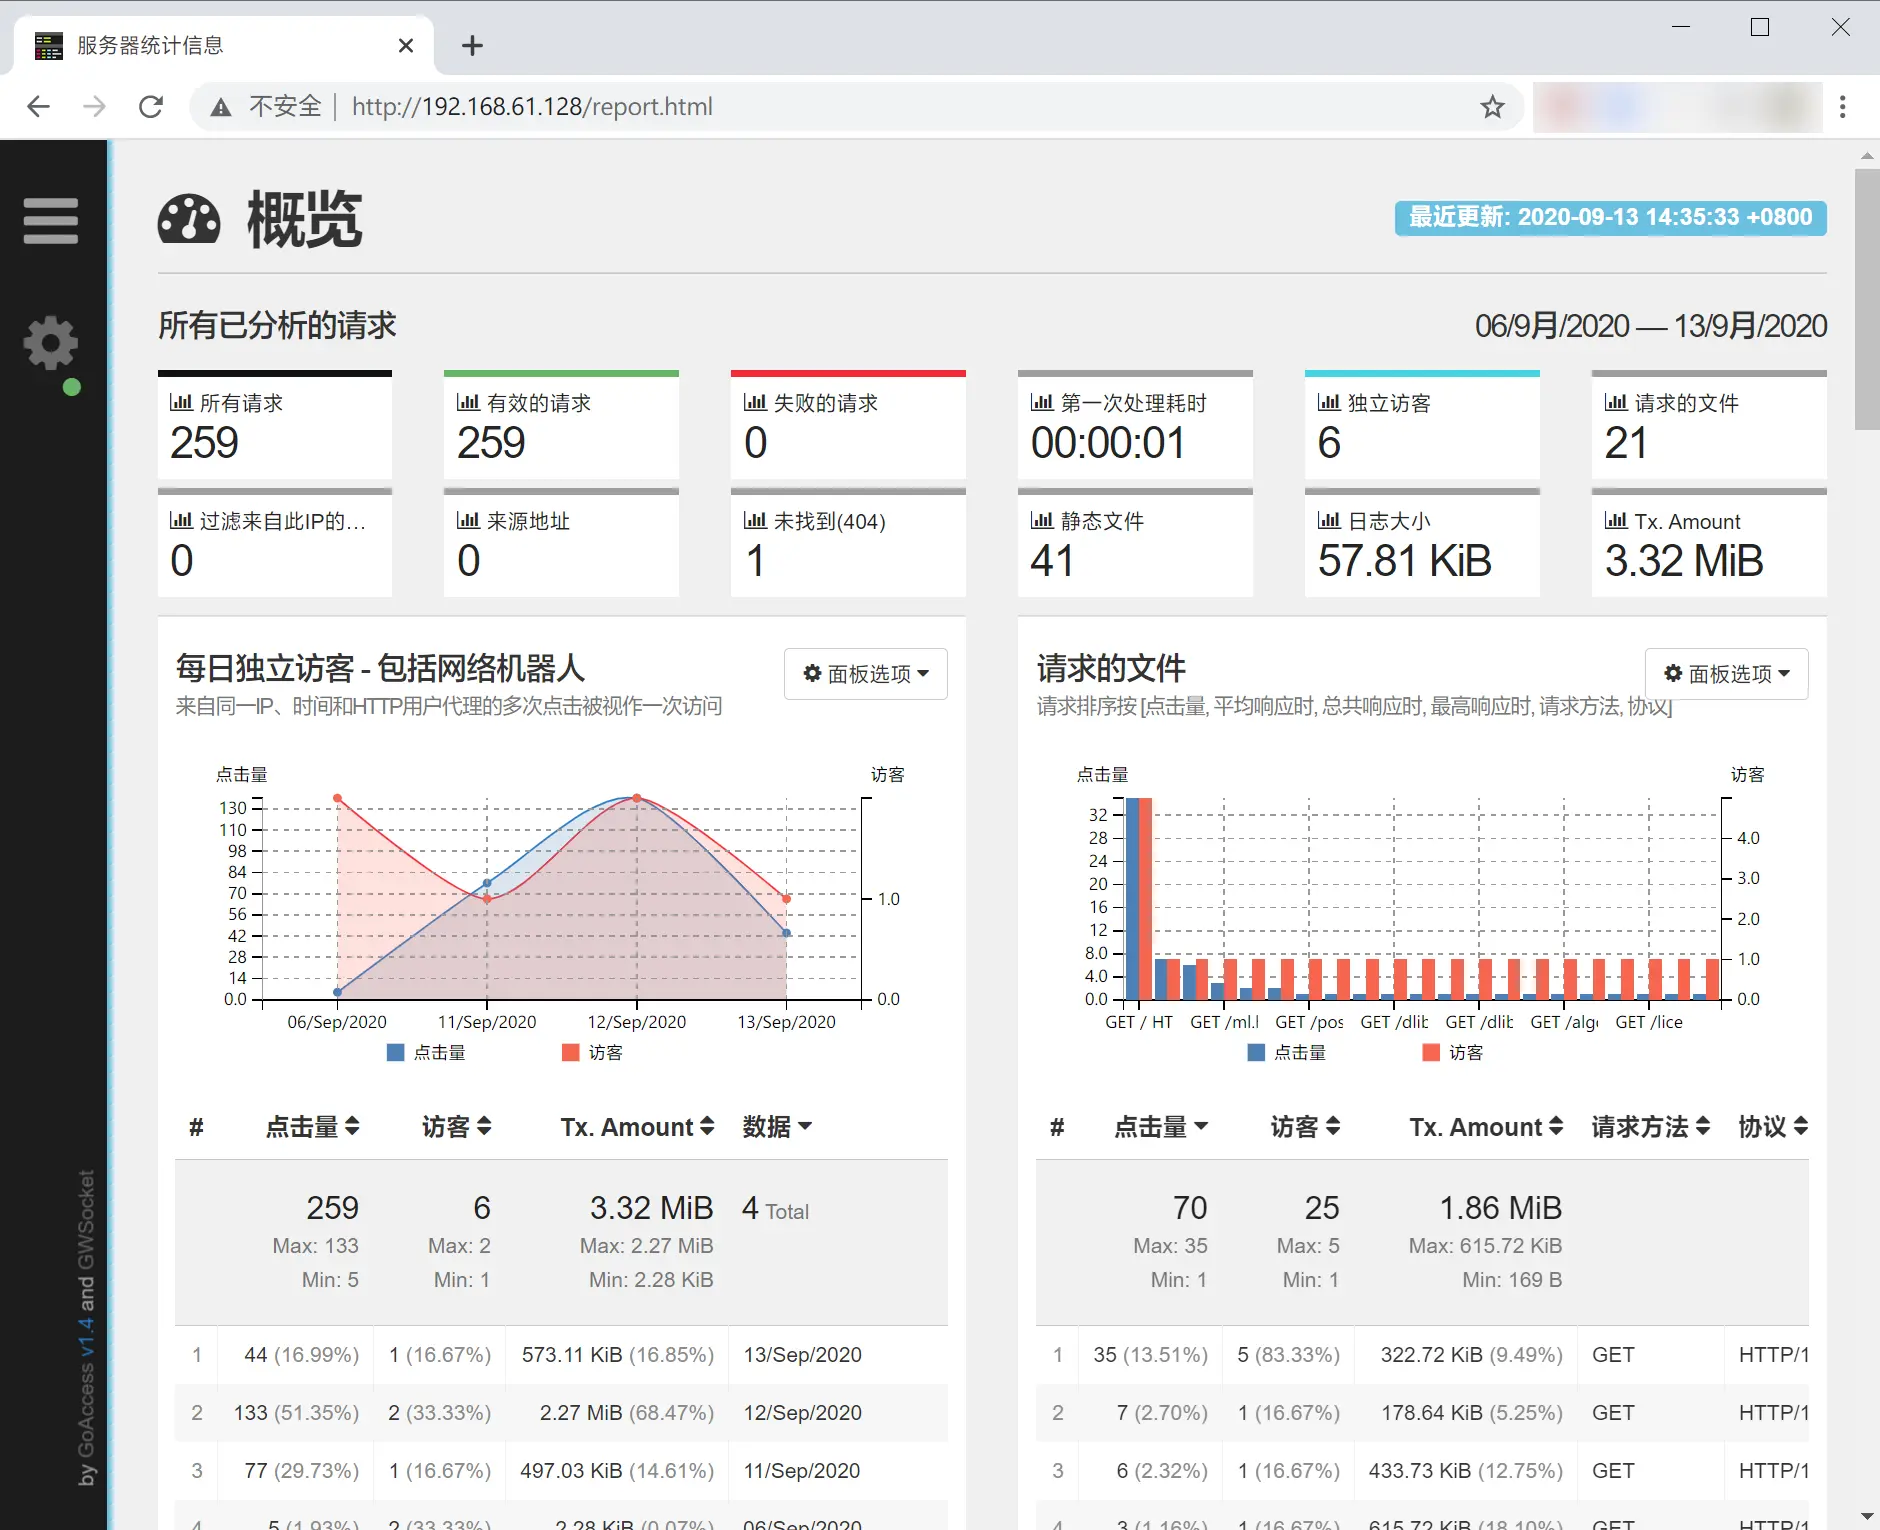
至此,日志可视化已经配置完成,我们可以直接访问 Nginx 服务地址/report.html 查看可视化页面,如下。

GoAccess 日志可视化界面

附录

Linux 查看端口占用状态

查看占用

1
netstat -anp

其中,参数 anp 分别表示:

  • a:显示所有活动的 TCP 连接,以及正在监听的 TCP 和 UDP 端口

  • n:以数字形式表示地址和端口号,不试图去解析其名称(number),参数 -n 会将应用程序转为端口显示,即数字格式的地址,如:nfs->2049,ftp->21

  • p:列出与端口监听或连接相关的进程,即 pid

关闭占用

在本例中,若要关闭 GoAccess 建立的连接,首先执行如下命令拿到其 pid。

1
netstat -anp | grep goaccess

结果如下。

1
2
tcp        0      0 0.0.0.0:7890            0.0.0.0:*               LISTEN      2323/goaccess
tcp        0      0 192.168.61.128:7890     192.168.61.1:56503      ESTABLISHED 2323/goaccess

然后手动 kill 其进程即可。

1
kill 2323
Licensed under CC BY-NC-SA 4.0
Built with Hugo
Theme Stack designed by Jimmy